Very welcome to my personal web blog. Here you will find various web contents that may be helpful. Please do not hesitate to provide feedback or ask any question you may have during the visit.
Power Apps Portals Configure SharePoint File Upload Size Limit
Posted: September 6, 2020 in Power PlatformTags: Portals, Power Apps, Power Apps Portal, powerapps, SharePoint/MaxUploadSize
There is a default single file size upload limit of 10 MB in Power Apps Portal with SharePoint Online integration. This can be configured to 50 MB. I have explained how to make the change on this post.
If you are coming from CRM world, probably it is an easy change on the Power Apps Portal. However, if you have never used CRM system there is no instruction on how to make this change. There is only one sentence in Microsoft documentation, which does not make sense if it is your first time configuring Power Apps Portal.
1- Navigate to Portal Site Settings
To navigate to portal site settings you can either go to Portal Management App then Site Settings. You can also click on Portal Settings and select “Site settings” from the right drawer window.

2- Insert new settings
Make sure Site Settings is selected on the left navigation then click New from the top menu.

Type on the Name exactly SharePoint/MaxUploadSize, choose your portal for Website field and type 50000 (in KB) on the Value field. You can also type some descriptions. Finally, click “Save & Close” and you might need to refresh the cache for your Portal and the settings should take effect immediately.

Custom Power Apps Notification
Posted: July 28, 2020 in Power App, Power PlatformTags: Power Apps, powerapps
Normally you will use push notification to send notification to users in Power Apps mobile application but what happens when majority of your users are using desktop browser for Power Apps!
In this post, I will explain how you can use your data source to push notifications to your Power Apps. I will use SharePoint online as data source but you can use any other data source for the notification.
1- Configure SharePoint List
Create a SharePoint custom list that contains at least three columns as shown on the screenshot below.

Go to your Power Apps details and copy the App ID

Insert a new item into the list with the App ID copied from previous step

For the Notifications field you can put an html something list this:
<html>
<body>
<h1 style="background-color: red; color: white">Very Important Notification</h1>
<h3>Click on the link below to watch the instruction video of the new procedure</h3><br>
<div style="display: flex;">
<a href="https://hikmatune.sharepoint.com/Shared%20Documents/Aerial%20Shot%20Of%20Seacoast.mp4">Watch Video</a>
<hr>
<img src="https://hikmatune.sharepoint.com/Shared%20Documents/faces.jfif" width="300" height="200" />
</div>
</body>
</html>
Make sure your sources are readable by all users i.e. everyone has permission to see the image and video
2- Configure Power Apps
Add SharePoint List as Data Source into your Power Apps.
Then use the list to lookup the notification and set a variable in Power Apps OnStart action:
Set(glbNotification, If(Len(LookUp(PowerApps, PowerAppID = "29e3aff6-badf-43bc-89ed-fccb3725cacf",Notifications))>10, true, false));
Notice, only set the globe notification variable to true if the the notification length is greater than 10, i.e. if the there is no notification the variable will be false.
On your Power Apps screen add a HTML Text control and set the visible property to “glbNotification”
The HTMLText Control should do another lookup to show the notification.
LookUp(PowerApps, PowerAppID = "29e3aff6-badf-43bc-89ed-fccb3725cacf",Notifications)
This is how the message will show up for the users regardless of desktop browser and Power Apps on mobile or tablet.

You can embed any html, the exit button sets the glbNotification to false i.e. Set(glbNotification,false). This way the message only shows up on the start up not when user navigate to other screens and come back to home.
Power Apps Controls with Office 365 Security Group
Posted: February 18, 2020 in Power App, Power PlatformThere are different ways you could show/hide controls in a Power App for different users. Using Office 365 Security Group is secure and easy to implement. In this post I will walk you through the process and show an example.
- You will need access (Office 365 User Admin or Global Admin) to create Office 365 Security Group
- You will need to add Office365Users and Office365Groups connectors into your Power App, make sure they are not blocked by DLP policy in your environment
1 – Create Office 365 Security Group
In Office 365 admin center navigate to Groups and click “Add
a group”.

In the add group window select Security and then click
Next.

Type the group name and put a description so other admins
know why this group exists.

Click “Create group” button.

If the group name already exists, you will get an error message.
You will need to add few members to the group.
2- Get Group ID from Azure Active Directory
Go to https://portal.azure.com and navigate to Azure Active Directory > Groups > find the group and copy Object Id.

3- Configure Power Apps
Edit your Power App and add the two required connections Office 365 Groups and Office 365 Users connections.

Then on your Power App go to the app OnStart function and create two collections:
ClearCollect(
    colCurrentUser,
    {
        '@data.type':"#Microsoft.Azure.Connectors.SharePoint.SPListExpandedUser",
        Claims: Concatenate(
            "i:0#.f|membership|",
            Office365Users.MyProfileV2().mail
        ),
        ID: Office365Users.MyProfileV2().id,
        DisplayName:Office365Users.MyProfileV2().displayName,
        Email: Office365Users.MyProfileV2().mail,
        Position: Office365Users.MyProfileV2().jobTitle,
        City: Office365Users.MyProfileV2().city,
        Office: Office365Users.MyProfileV2().officeLocation
    }
);

ClearCollect(coTicketAdminMembers,Office365Groups.ListGroupMembers("014f6c73-72ea-44c4-877d-381cf94f7927").value);

Set(glbTicketAdmin, If(First(colCurrentUser).Email in colTicketAdminMembers.mail,true, false));
Then on all the controls that you want to show only to admins, set the visible property to glbTicketAdmin (i.e. when glbTicketAdmin Boolean is true then show the control).
If you have a gallery and you want to show different screen when admins (i.e. office 365 group members) click on an item, you could modify the gallery OnSelect function as shown below.
In my case if admins click on the gallery item, it will open detailed admin screen in edit mode. However, for other users who are not part of the office 365 group they will see another screen in view mode.

Here is are the screenshots when normal users open the Power App, notice they don’t see the left navigation menu.

When the users click on an item on the home screen galley they will see the item details in view mode.

However, when users who are member of the Office 365 group opens the Power App they will have a left navigation with extra functionality.

And if they click on the an item in the gallery they will see a more detailed screen in edit mode.

I have managed to get the list of group members in “Assigned To” field, if you are interest put comments I will be able to explain.
Usually you would like to know last time a database was restored. This is very handy script to show you the details.
WITH LastRestores AS

(

SELECT

DatabaseName = [d].[name] ,

[d].[create_date] ,

[d].[compatibility_level] ,

[d].[collation_name] ,

r.*,

RowNum = ROW_NUMBER() OVER (PARTITION BY d.Name ORDER BY r.[restore_date] DESC)

FROM master.sys.databases d

LEFT OUTER JOIN msdb.dbo.[restorehistory] r ON r.[destination_database_name] = d.Name

)

SELECT *

FROM [LastRestores]

WHERE [RowNum] = 1
You can simply get the details from dbo.restorehistory from MSDB databases. However, the above script will provide more details.
To setup the MFA for the first time follow the steps below.
Your company should provide you with a login details to Office 365. The access is usually through the Office 365 portal or SharePoint Online. Once you have the link and credentials follow the steps below:
1.Go to the provided URL (http://portal.office.com or http://companyname.sharepoint.com)
2. Type in Work username and password then click “Sign in”

3. You will get the below message to setup MFA click on “Set it up now”

4. Another window opens that asks you – How should we contact you? Fill the details and click “Contact me”.

There are different options here. I have chosen to send me a text message.
5. You will receive a text message with a verification number. Enter the number on the new window and click “Verify

6. Once the verification is completed you will see the Additional security verification. You should copy the password somewhere safe you will use this password to login to Skype for Business and other apps. Once completed click “Done”

7. You will be logged into the Office 365 portal or SharePoint site depending on what link you have used.
Any subsequent logins will require you to use a verification code which will be sent to the phone you have selected initially or choose a different verification method.

Error 741: The local computer does not support the required data encryption type
Posted: January 24, 2016 in VPNTo resolve the error go to Network Connection and right click on the VPN connection then click on properties:
 Go to Security tab and change the Data encryption to Maximum strength encryption:

Click OK and try again.
Management Reporter 2012 – Bad or missing data was encountered while loading the report and its building blocks – Error resolved
Posted: January 24, 2016 in Dynamics AX, Management ReporterError Definition:
The error has been observed on AX2009 Kernel (5.0.1600.3090) with Managment Reporter 2012 RU13 both databases installed on SQL 2012 SP1.
When running a Management Reporter 2012 report this error is shown in the Report Queue Status:

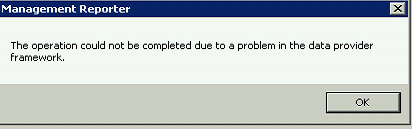
Try going into Column Definitions and open any column definition. If you get error “The operation could not be completed due to a problem in the data provider framework” check Windows Event logs.
On the event logs the very first error on Management Reporter may show something like “One functional currency code must be defined”

Resolution:
To resolve the issue you must enable the secondary currency in Dynamics AX and set the secondary currency for all existing companies. -If you need help on this feel free to drop a message.
Turn on flag – DBCC TRACEON 1222
Start monitoring the SQL Server Event Logs.
CCNA (Cisco Certified Network Associate) Useful Resources
Posted: December 10, 2013 in CCNA, Front PageThere are enough online resources available to encourage you prepare for CCNA. I would suggest get your hands on ICND1 and ICND2 books written by Wendell Odom. These two books are very well detailed and provide you a great insight to CCNA and teach you everything you need to know to pass CCNA.
There are other resources that could be of immense help while preparing for CCNA like Chris Bryant Video Boot Camp. And Pual Browning new site howtonetwork.com.
Make sure you install GNS3 on your machine. It is a unique graphical network simulator. You would need ISO images to be able to use the routers in GNS3 and you can find them online. There is one thing that no software simulator can provide, a full switch mode you would need a real cisco switch to practice some of the commands.
For the well-know port numbers click here.
PostgreSQL Changing the currency symbol or number of decimal places
Posted: April 19, 2013 in postgresqlThe procedure below only works for Window OS but the same method should work for other operating systems.
Start command-line: keyboard shortcut Windows+r then type cmd OK
runas /user:postgres cmd
You will need to enter postgres user’s password if you are not sure what the password is you should be able to change it through Computer Management under control panel. Please ask if you are not sure.
Once you successfully logged in as postgres user you will need to open Regional and Language settings via the command-line:
control intl.cpl
Make all the required configurations then restart postgresql service.
